Late Summer Lawn Maintenance

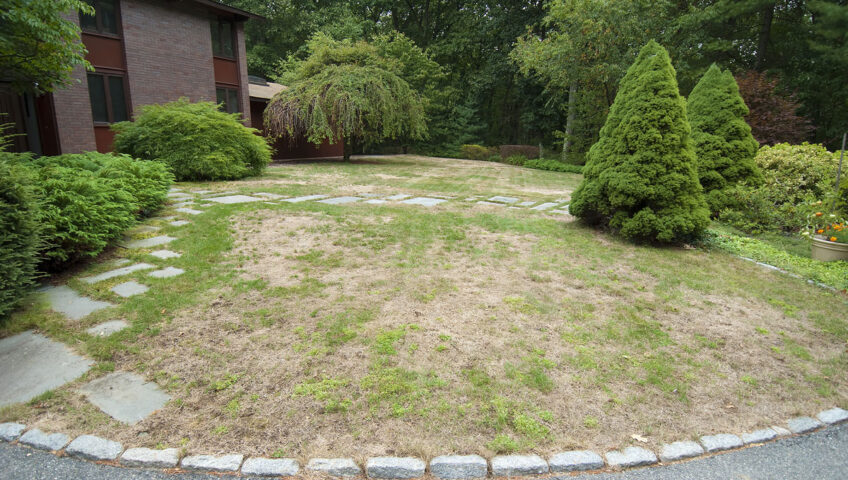
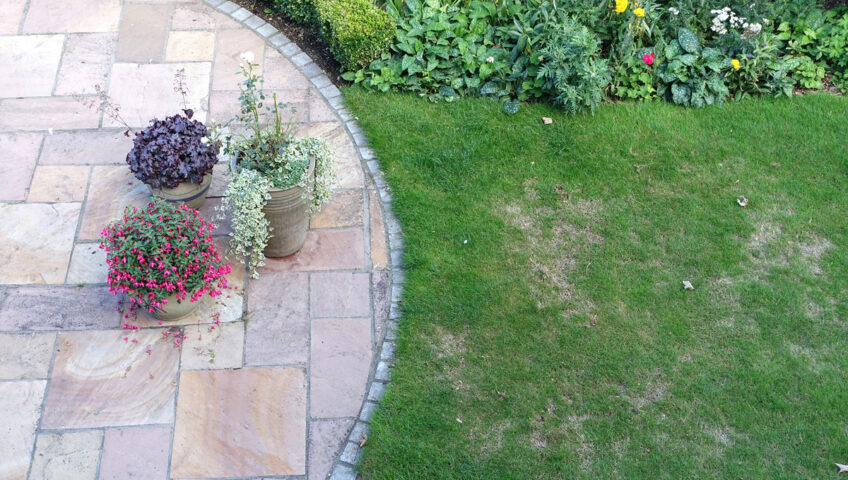
It’s the time of the year where we here at Liberty Lawn start thinking about late summer and fall lawn maintenance. There are a few different turf issues you should be on the lookout for, as well as some maintenance tasks that should be scheduled soon.

Gray Leaf Spot in Turf

This disease primarily affects perennial ryegrass and tall fescue. Kentucky bluegrass is resistant. High heat and humidity help this disease develop rapidly. Symptoms start as small, water-soaked lesions, progressing to leaf death. As leaves die, they twist and develop a Shepherd’s hook appearance. Disease in mixed grass stands look sparse as leaves die, and can often be confused with wilt or heat stress. Gray leaf spot is most severe in highly fertilized turf, or those stressed by environmental factors (soil compaction, drought, etc.) Leaf wetness favors infection, so irrigation should be done in the morning to allow grass leaf blades to dry before evening. Strobilurin fungicides and thiophanate-methyl provide the most effective control.

Dollar Spot in Turf

This is a minor disease for most home lawns. To identify dollar spot, symptoms appear as four to six-inch, straw-colored patches of blighted turf. A bleached lesion in the shape of an hour glass is present on the leaf blade. The lesion has a characteristic reddish-brown margin. In early, dewy mornings, a cobweb-like mycelium is visible in the affected area. Applications of a lawn fungicide will be needed to control this disease.

Winter Annual Weed Control

It’s time to start applying pre-emergent herbicide to control winter annuals in lawns. Common winter annuals include little barley, henbit and corn speedwell. Winter annuals germinate in fall, survive the winter, then grow, bloom, go to seed and die the following spring/summer. Maintaining a dense turf and tall mowing height to help lawns shade out and compete with weeds, along with the use of a herbicide applied in early-mid September provides the most effective control.

Lawn Renovation & Overseeding

LATE AUGUST TO MID-SEPTEMBER

Late August to mid-September is the time to start thinking about lawn renovation and overseeding for cool season grasses, including Kentucky bluegrass and tall fescue. Now is the time to prepare the seed areas, whether doing a complete renovation or over seeding. When purchasing seed, buy from a reputable retailer and look for blue tag certified seed to avoid planting a problem.

As always, we are here to help you with any turf and lawn questions you may have. Give us a call anytime!

LibertyLawn@gmail.com / 402.423.0061

3810 Cornhusker Hwy, Lincoln, NE 68504 / PO Box 29442. Lincoln, NE 68529

Japanese Beetles Treatments: Apply Now

With over 300 ornamental and edible plants they like to feed on, Japanese beetles (JB) can quickly become an overwhelming insect in the landscape.  Last year, one customer brought in his peach so covered in Japanese beetles that it was hard to identify the fruit as a peach!

If you didn’t have Japanese beetles last year, then hooray, you may not get any this year or if you do get them, they will be in low numbers. But if you had JB last year, chances are very good you’ll have them this year, too.

For perennials and roses, systemic products containing imidacloprid can be used in May to allow time for distribution within the plant. Topical sprays containing bifenthrin or chlorantraniliprole will keep JB populations down while limiting the amount of injury or death to bumble bees and other pollinators. This can be done when the adults emerge, usually in June.

Treating the soil for JB grubs does control this immature life stage but does not create a force field of protection to keep Japanese beetle adults from flying in from other areas.  Where there is food, the Japanese beetle will feed.

Using Japanese beetle traps is NOT a good idea because the traps are too effective at what they do. Research indicates JB traps attract more beetles to the yard than those yards that have no traps, resulting in more damage to trees, roses and edible plants.

Linden trees can be a magnet for Japanese beetles.  Treatment options are limited because it is illegal to use any systemic insecticide (one that moves internally via the tree’s vascular system) on linden trees.  Contact Liberty Lawn & Landscape, Inc. for treatment if your linden and/or other landscape plants have Japanese beetles.

Don’t hesitate to get in touch with us if you have any questions or concerns about Japanese beetles in your landscaping!

CapitalArborist@gmail.com / 402.466.0160
P.O. Box 240, Ceresco, NE 68017

Late Summer Lawn Concerns

Brown Patch

IRREGULARLY SHAPED TAN LEAF LESIONS WITH RED MARGINS; ROUGHLY CIRCULAR BROWNISH PATCHES IN TURF

Brown Patch disease shows up as reddish-brown patches in lawns. Grass blades within or near the affected area will have tan colored, irregular shaped lesions with a reddish margin. Fungicides may be needed to reduce the disease infestation. Also, to aid recovery, maintain consistent growth; not too slow and not too fast. Try to keep grass growing about 1 to 1.5” per week. If it is below that, a summer fertilization is recommended; especially if the lawn is less than 10 years old. Water in the mornings when the wind is calm, humidity is high, and evaporation rates are lowest. Know that turfgrass does not need, and will not benefit from, “cooling” irrigation (syringing) in the afternoons.

Turf Dormancy

KENTUCKY BLUEGRASS VS. TALL FESCUE

A tall fescue lawn should NOT be allowed to go dormant as it is not likely to recover. Kentucky bluegrass (KBG) can be allowed to go dormant for a short period to conserve water. Why the difference? KBG physiologically has the ability to go dormant (turn brown but still be alive) to escape drought conditions during hot, dry summers. On the other hand, tall fescue tolerates drought due to a much deeper root system but cannot physiologically go dormant to avoid drought. If tall fescue turns brown, it is likely dead.  Due to a deeper root system that uses soil moisture deeper in the profile, tall fescue does require less frequent irrigation than shallow-rooted Kentucky bluegrass.

If a homeowner chooses to let KBG to go dormant, remind them that during very hot, dry conditions, the lawn may need about ¼” of water a week to moisten crowns; and KBG can remain dormant for about 4 to 5 weeks only. If fall conditions remain hot and dry, irrigation should resume.

Yellow Lawns & Iron Chlorosis

WEATHER CONDITIONS FAVOR DENITRIFICATION AND YELLOWING OF TURFGRASS

While summer yellowing of Kentucky bluegrass & Tall Fescue lawns is due to iron chlorosis, the chlorosis is believed to be caused not only by high pH soil but also by a root dysfunction from hot and/or wet soils. Iron chlorosis will NOT respond to an application of nitrogen. When yellowing occurs, apply an application of iron, such as iron sulfate.

Eastern Red Cedar and Juniper Browning

MAY HAVE A VARIETY OF CAUSES

Cercospora blight is a fungal disease that will cause browning from the bottom of the tree up and from the inside of the branches out. If this disease is confirmed, applications of Bordeaux mixture or a liquid copper fungicide such as Tenn-Cop 5E will effectively control this disease. At least two applications are needed for good control. The first application should just prior to initial infection (June/July). The second treatment should be made during the last half of July through mid-Aug. The second application normally gives good protection against infection for the remainder of the season. However, additional applications may be necessary during periods of frequent rains.

Turfgrass watering

ENCOURAGE CUSTOMERS TO USE CORRECT IRRIGATION PRACTICES PROMOTE TURFGRASS HEALTH

Watering turf wisely during mid-summer is especially important to promote a healthy turf, reduce insect and disease pressure, and conserve a natural resource. It is much better to stay on the dry side than to over-water. Excess moisture in the root zone reduces soil oxygenation, increases soil heat retention, and increases disease risk.

Some broad advice to help avoid all of these issues:

  • Make sure your irrigation systems are working correctly
  • Adjust irrigation schedule according to weather conditions
  • Know how much water each irrigation system puts out
  • Don’t over water
  • Resist the temptation to syringe turf (water in afternoon to “cool off” turf)

Thank you for your business, please get in touch if you have any questions or concerns!

LibertyLawn@gmail.com / 402.423.0061

3810 Cornhusker Hwy, Lincoln, NE 68504 / PO Box 29442. Lincoln, NE 68529

Maintenance Updates

Here is an update on some of the concerns we are seeing in our turfs and landscape beds currently in and around Lincoln. We are actively applying to the Department of Agriculture to have access to regulated and approved products to help curb these pests.

Brown Patch in Turf

Symptoms are reddish brown circular patches, with grass blades in or near the patch having irregular shaped tan lesions with red margins.

Unlike lesions of dollar spot, these usually do not encircle the leaf blade. Brown patch may be more noticeable in tall fescue lawns but Kentucky bluegrass is also affected. Brown patch is most often found in slower growing turf, but can show up in fast growing lawns after fertilization with fast release nitrogen sources (Liberty Lawn only applies at least 50% slow release fertilizer products). Fungicide controls in lawns may be needed. Know that younger lawns, 10 years old or younger, require more nitrogen fertilization than older lawns.

Dollar Spot in Lawns

Leaf blades exhibit straw-colored dead spots with reddish-brown margins; lesions pinched at center into an hour-glass shape; 4-6 inch dead spots in turf.

The best way to manage dollar spot in lawns is with a July application of fertilizer to help it grow out of the damage and fungicide applications may also be needed.  To identify Dollar Spot, symptoms appear as four to six-inch, straw-colored patches of blighted turf. A bleached lesion in the shape of an hour glass is present on the leaf blade. The lesion has a characteristic reddish-brown margin. In early, dewy mornings, a cobweb-like mycelium is visible in the affected area.

Bagworms Hatching, Time to Control

Once overwintering eggs on trees begin to hatch, insecticide control can begin. Upon hatching, bagworms are about one-eighth of an inch long and difficult to detect. When bagworms are small, bacillus thuringiensis (kurstaki) and spinosad are biorational insecticides that can be applied to foliage to kill young caterpillars as they feed. While not the most effective means of protection against bagworm infestation, biorational insecticides kill caterpillars without causing harm to natural enemies. They must completely cover foliage and be consumed by bagworms to be effective. After the month of June, when bagworms are bigger, conventional insecticides need to be used and these may include malathion, acephate, carbaryl, bifenthrin, permethrin etc. Preventive or systemic insecticides containing dinotefuran are applied to the soil but these must be applied weeks before hatching, so it is too late to use these products now.

Please let us know if you have any questions or concerns. Have a great 4th of July, and Thank You for your business!


How to Trim Your Bushes

Though perhaps not the most popular types of landscaping plant, bushes, shrubs, and hedges are beautiful plants that add natural beauty and curb appeal to your home. Easy-to-maintain and often vibrant year-round, they make a great addition to accent your lawn, trees, gardens, and hardscapes, such as walks, patios and walls. They can also be great ways to provide a windbreak, privacy screen, or even a living fence around your yard. Keep reading to learn about the types of trimmers you can opt to use, as well as some tips on how to trim bushes yourself.

Types of Trimmers

If your bushes are left to become overgrown, however, they can negatively impact your curb appeal, making your yard look messy and unkempt. But maintaining these types of plants is actually quite simple, thanks to readily available and affordable hedge trimmers. There are three types of hedge trimmers available, depending on your individual needs and preferences:

  • Gas-powered Trimmers

These trimmers have the most powerful engines, and are best for cutting through thicker branches. They also have the advantage of not being tethered by a cord, which makes them a great option for people with large yards. They can be more expensive than other trimmer options, and require you to mix a small amount of oil with the gas in order to keep the engine lubricated.

  • Corded Trimmers

Less expensive in quieter than gas-powered trimmers, corded trimmers are a great option for those with smaller yards and are virtually maintenance-free. You also don’t have to worry about using a pull-start or a choke to get it going each time you use it. They are slightly less powerful, making them better suited to small and medium-sized bushes.

  • Cordless Trimmers

While cordless trimmers have been around for a number of years, it was only recently that, thanks to advancements in battery technology, that they became a popular option for trimming bushes. Much like corded trimmers, they require little maintenance, are easy to start, and are very quiet. While they can be less expensive than gas-powered trimmers, many require you to purchase the battery and charger separately, which can make them more expensive than corded options.

Hedge trimmers are very simple to use, though it is important to be careful as they have sharp blades. Always keep two hands on your trimmer when it is turned on. If you find a branch that is too thick to cut with your trimmers, never try to hold it still with one hand while cutting. Instead, use a pair of hand pruners to ensure you don’t accidentally injure yourself or the bush with your powered trimmers.

Trimming Your Bushes

The number of times you trim your bushes every year depends on the look you’re going for. If you want less formal, more natural-looking bushes, trim them just once or twice a year. For more formal bushes and hedges, you’ll want to trim three to four times per year.

Start trimming your bush from the bottom and work your way up, taking on a little bit off at a time. Avoid trimming the bush into a “V” shape, which discourages light from getting to the bottom branches and root system, and can make them lose their leaves or needles. Instead, aim for a shape that is slightly wider at the bottom, which allows optimal exposure to sunlight and promotes a full, lush bush.

To cut the top flat, hold the blade level with the ground and move from right to left, then left to right. Take only a little bit off at a time, guiding the blade as level as possible. For tall bushes or hedges, you can use stakes with a string tied across them as a guide to get a straight, even cut. Stop as you go to use your hands to remove cut pieces from the bush. It will likely take several passes to get the bush into the shape you want.

Make sure to trim bushes in the early morning or late afternoon to avoid sunburning the freshly cut branches. You should also avoid trimming bushes in early spring when birds are nesting. When you’re done trimming the bush, you should go through it by hand with your pruning shears to find and remove any dead or diseased branches inside of the plant.

If you aren’t confident trimming your own bushes, Liberty Lawn is here to help. We offer all kinds of yard services, including bush trimming, to keep your yard looking its best all season long. Give us a call today to schedule a free consultation!

How to Fertilize Your Lawn

All plants need more than just water and sunlight to thrive, and grass is no exception. Applying fertilizer to your lawn feeds it necessary nutrients that it needs to grow thick and lush. Maintaining a thick, lush lawn helps prevent weeds from sprouting and moving in, allows your lawn to fight off disease, and helps roots retain more water during warm summer days.

Most fertilizers are only effective for 6 to 8 weeks, so maintaining a regular fertilization schedule is essential in keeping your lawn healthy all season long. Here are the steps you should take to fertilize your lawn:

  1. Water your lawn. A day or two before you fertilize your lawn, give it a good watering. Ensuring your soil is damp, but not soaking wet, helps the soil absorb the fertilizer.
  2. Pick the best spreader for your lawn. There are a few different types of spreaders, and you’ll want to be sure you have the correct one to make the application quick and easy. For small lawns, a handheld spreader can work just fine, whereas people with bigger lawns will benefit from a push-type spreader. Make sure to adjust the spreader settings. Each fertilizer product has a spreader setting on the package to ensure correct coverage.
  3. Start by applying grass fertilizer around the perimeter. It is always best to start applying fertilizer around the perimeter of your grass, as it is the easiest area to accidentally miss spots. Simply walk around the entire perimeter, ensuring you move steadily for an even application.
  4. Fill in the middle. Similar to a mowing pattern, feed your lawn by walking back and forth in straight lines, making sure to overlap slightly with each pass.
  5. Properly store any remaining product. Once you’ve finished fertilizing your lawn, return any unused product to the bag and store it for future use. Be sure to keep it in a cool, dry place away from pets and children.

We hope that this article has helped you to learn about the benefits of fertilizing your lawn. If you aren’t certain which fertilizer is best for your individual needs, or aren’t able to fertilize on a regular schedule, Liberty Lawn is here to help. We offer all kinds of yard services, including lawn fertilization, to keep your yard healthy and looking good all season long. Give us a call today to schedule a free consultation!

7 Benefits of Using Mulch

When it comes to quick, easy, and inexpensive ways to spruce up your curb appeal and benefit your plants, you can’t beat mulching. Mulch comes in many different forms, from wood chips and pine needles, to recycled tires and river rocks. But did you know that mulching has many different benefits beyond just looking nice? Here are 7 different benefits that applying mulch can have for your yard.

  1. Controls Weeds

Using mulch helps to control weeds in your yard by taking up open spaces. The mulch acts as a barrier, preventing sunlight from reaching the ground and causing weed seeds to germinate. It is a great way to help prevent weeds in garden beds.

  1. Retains Moisture

Mulch helps your soil to retain moisture by absorbing water and limiting evaporation. This means that, during hot summer months or periods of drought, you will have to use less water to keep your plants healthy. This not only ensure happy plants, but also helps cut down on your water bill.

  1. Prevents Soil Erosion

Mulching not only helps to keep water trapped in the soil, it also prevents rain water from washing away your soil. Mulch helps prevent erosion creating a barrier on top of the solid that breaks the fall of the water, and lessens the force when the water impacts the ground.

  1. Maintains Soil Nutrients

Not only does mulch help keep water in the soil, it also helps to keep nutrients in the soil. In addition, if you choose an organic mulch such as wood chips or pine needles, as they slowly decompose they will release additional nutrients directly into your soil.

  1. Controls Pests

Using certain types of mulch, such as cedar bark, can deter certain pests due to the fact that the cedar bark has natural oils that act as insect repellent. To reap the full benefits, be sure to find a mulch that is very fragrant, as it will have the greatest effect on insects. Some mulches, however, can encourage insects to flock to your garden, and even your house if your mulch touches your home. Be sure to research which type of mulch will best suit your needs.

  1. Encourages Earthworms to Move In

Using organic material for mulching can encourage earthworms to occupy your garden soil. Earthworms like the damp, dark area underneath mulch, and they make a great addition to your garden because earthworms help improve soil structure and nutrient cycling.

  1. Polishes up Your Garden

Mulch can give a garden a finished look by filling in the empty spaces while being one of the easiest fillers to maintain. Grass, groundcovers, and other fillers may take extensive care, such as mowing and watering, as well as competing for resources with your garden plants. Mulch is easy to care for and never competes with your other plants.

We hope that this article has helped you to learn about the benefits of mulching in areas around your yard. If you aren’t certain which mulch is best for your individual needs, Liberty Lawn is here to help. We offer all kinds of yard services, including mulching, to keep your yard healthy and looking good all season long. Give us a call today to schedule a free consultation!


Can I Overseed My Lawn in Late Spring?

For many homeowners, achieving a thick, lush lawn in a battle they fight each and every year. From winter damage to summer droughts, there are many things that can get in the way of achieving your dream lawn. If your lawn is looking weak, or is thin in some areas, there is a solution beyond just fertilizing: overseeding. Many people don’t realize that overseeding is a great solution to keeping your lawn healthy, even after your grass has established itself. Read on to learn about how overseeding helps your lawn, the best time of the year you can do it, and how you can tackle this task yourself.

Why Should I Overseed My Lawn?

Overseeding simply refers to applying new grass seeds over your existing lawn. Unlike reseeding, it doesn’t require removing any of your existing growth. Instead, overseeding works to fill in bare spots, improve the thickness of the lawn, and enhance its color. In addition, overseeding newer varieties of grass into an older lawn can improve its ability to withstand insects, disease, drought, and heavy traffic.

When Should I Overseed My Lawn?

There are two ideal times of the year to overseed your lawn – fall and spring.

  • Fall is the best time of year to overseed. This is because your soil is still warm, which means that the grass seeds will germinate faster. And because there are fewer weeds growing this time of the year, your grass will have fewer competitors vying for their water, sunlight, and nutrients.
  • Overseeding in spring is still a good option. The key is to wait until the soil warms up enough that the seeds can germinate before they’re eaten by your local wildlife. You’ll also want to be sure you overseed before the hot summer months, which can kill seeds and new sprouts if there isn’t enough rain to keep them moist.

How to Overseed a Lawn

In order to give your need grass seeds the best start, you should follow these steps:

  • Choose a Grass Seed

Which type of grass seed you choose depends on your existing grass type. There are many options to choose from, including warm and cool season grasses, as well as ones that are aimed at helping to thicken thin lawns. If you aren’t sure of the best grass for your area, your neighborhood garden or home improvement center can help you choose the right seed.

  • Mow Low

Before overseeding your lawn, cut your grass shorter than normal and be sure to bag the clippings. Next, you should rake the lawn to help loosen the top layer of soil and remove any dead grass and debris. This helps to give the grass seed easy access to the soil so it can root quickly after germinating.

  • Improve the Soil

Before spreading you seend, it’s a good idea to rake in a thin layer of compost over your lawn to help the seed settle in, especially in areas where grass is thin or completely gone. Aim for about a quarter of an inch of compost so that you don’t kill your existing grass.

  • Spread the Seed

Spreading the seed is the easiest part of the overseeding process. Simply fill up your spreader, adjust the setting according to the label directions, and apply. You can choose either a hand-held spreader, or a push-type model which is very handy for large yards.

  • Feed and Water

To give your new grass seedlings the nutrients they need to grow strong, apply a quality fertilizer after spreading your seed. Then, be sure to keep the soil consistently moist by lightly watering once or twice a day until the seedlings are the same height as the rest of your lawn.

We hope that this information has helped you to learn about overseeding your lawn. If this isn’t a job you’d like to tackle yourself, Liberty Lawn is here to help. We offer all kinds of yard services, including overseeding and fertilization, to keep your lawn lush and green all season long. Give us a call today to schedule a free consultation!

The Best Time to Fertilize Your Lawn

One of the easiest ways for you to ensure your lawn grows thick and green this year is to fertilize and reseed. A well-fed lawn is healthier, and has a stronger root system that can withstand heat, drought, cold snaps, foot traffic, mowing, and other stressful events. While feeding your lawn once a year is adequate, having a schedule in place to fertilize your lawn four times per year is the best option to keep it healthy through the growing season, and ensure it comes back just as strong each spring.

When to Fertilize Your Lawn

When it comes to using fertilizer on your lawn, timing is everything. Making sure your lawn gets fertilized at the right time not only helps to boost its growing potential, it also ensures you don’t apply it when it isn’t going to be as effective.

  • Early Spring

When your lawn begins to wake up in the spring, its store of nutrients is typically completely gone. Fertilizing in early spring helps to immediately feed your grass’ roots, and gets the spring growing season off to a great start. Apply early spring lawn fertilizer once between February and April, as soon as your grass greens up and begins growing. This is usually best done around the same time that your lawn needs its first mow of the season.

  • Late Spring

By late spring, your lawn has likely used up all of its stored energy from its last feed and is in need of another boost. Apply late spring fertilizer once between April and June, about six to eight weeks after you fed it in early spring. This will keep your lawn well-fed into the hot summer months.

  • Summer

The summer months bring heat, drought, foot traffic from kids and parties, as well as a host of insects. All of this can be tough on grass, and if it isn’t fertilized it can turn brown and patchy. Apply summer fertilizer once between June and August, about six to eight weeks after you fed it in late spring, to keep your lawn going strong through the heat.

  • Fall

It may seem odd to fertilize your lawn right before it goes into hibernation, but it is in fact a very important time to fertilize. Your lawn needs nutrients to recover from many summer damage, as well as to get ready for hibernation. Fall fertilization helps to strengthen roots to keep your lawn from getting damaged through the winter. Apply fall fertilizer once between August and November, right before you expect your first freeze, which should be about six to eight months after you fed it in summer.

We hope that this information has helped to to learn about when you should be fertilizing your lawn. If this isn’t a job you’d like to tackle yourself, or if you’re worried you’ll forget about it, Liberty Lawn is here to help. We offer all kinds of yard services, including fertilization, to keep your lawn lush and green all season long. Give us a call today to schedule a free consultation!

Dethatching your Lawn to Maximize Growth

Most people know that having a healthy lawn requires good soil, the right amount of water, and plenty of sunlight. But did you also know that dethatching can be an equally important part of your yearly lawn care routine? Not all lawns will require dethatching, but it is important to be able to tell when it does need it, and how to do it properly.

What is Thatch?

Everytime you mow your lawn, small bits and pieces of grass get left behind to die and settle on top of your soil. This is thatch. A small amount is actually good for your soil, as it breaks down and adds nutrients that the grass will feed off of, and also helps to hold in moisture. Anything less than half an inch is considered safe and beneficial for your lawn. Too much thatch, however, can lead to problems as it prevents water and air from reaching the down into the soil. If your grass isn’t growing as well as it should despite proper care, there is a very good chance that thatch is to blame. An easy way to tell if you have too much thatch is to touch it; if the thatch is too thick, your lawn will feel spongy and it will be difficult to get your finger all the way down to the soil.

How to Dethatch

Before you work on dethatching your lawn, you should first trim it to half its normal height. Make sure to mark and shallow sprinkler heads or water lines if using powered dethatching equipment. There are a number of different ways that you can go about dethatching your lawn. These include:

  • Manual dethatching with special rakes.

These heavy, short-tined rakes have curved blades that are designed to dig into your lawn and pull up thatch as you rake. Dethatching rakes are good for light thatch and general thatch maintenance on small lawn areas.

  • Power rakes.

These mower-like devices have rotating, rake-like tines that dig into thatch at the soil level and pull it up. Power rakes work well for lawns with thinner thatch layers and grass that can withstand intense raking.

  • Vertical mowers.

Also called verticutters, these mowers have vertical blades that slice down through the thatch layer and into soil, pulling thatch—and often grass roots—to the surface as they go. Their blades adjust to control how much thatch you remove at once. Verticutters are best for thick thatch layers on lawns that have been neglected for an extended period of time.

You can purchase a manual dethatching rake at most home and garden stores. For power rakes and vertical mowers, you will need to find a local equipment rental store. These stores often keep power rakes and vertical mowers on hand, especially during the dethatching season. Whatever option you choose, when you are finished make sure to clean up all of the debris and water your lawn thoroughly and consider fertilizing to help any damaged areas recover.

The Best Time to Dethatch

The best time to dethatch your lawn depends on the type of grass you have, as it should be done when the grass is actively growing and the soil is moderately moist. For cool season grasses, this means early spring or early fall. For warm-season grasses, late spring through early summer.

If you aren’t ready to tackle this job yourself, or if your thatch is extremely thick, consider calling in a professional instead. We offer dethatching services to suit any yard size, and always clean up all debris. Give us a call today to schedule a free consultation!